2nd grade- Trade Beads

The second grade is learning that people all around the world have used beads for trade.  A person would give a bead and receive something in return.  Beads that are used like this are called trade beads.  Sometimes, people traded beads to show friendship.  Have you ever given a friend a gift?

Artists still make tradebeads from many materials, like glass, paper, and clay.  What materials, or media, were used to make these beads?

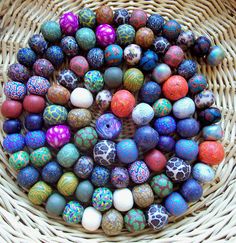
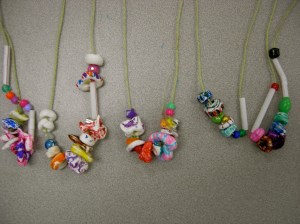
We will make trade beads out of clay, paint them, trade them with friends, and make necklaces.

Learn more about how glass beads are made all around the world:

Your turn…Steps:

1) You will need half of a packet of Model Magic.

2) Follow these steps to make your beads. Your clay will be all white. Make sure the hole is big enough for yarn. (These holes would be too small!) The hole will shrink a little when it dries. Make AT LEAST 10 beads, try new shapes. Make one bead just for your teacher (shh…it’s a surprise!).

babbledabbledo.com
babbledabbledo.com

3) Gently place your beads in the egg carton. Make sure they are in the spots with your name. Let your beads dry, go help a friend!

4) Once beads are dry, gently take them out of the egg carton. Place them on your scrap paper.

5) Use markers to color your beads- your hands will get messy, it’s okay! Use the scrap paper to keep the table from getting messy.

6) Trade three beads with three different people. Give me your bead for your homeroom teacher, I will make the surprise necklace.

7) String your beads onto your yarn. Tie a knot. Wear your necklace. Be careful, the colors will come off if your bead gets wet!

Our Bibelots are back!

Bibelots are backI picked up our Bibelots from the Headley-Whitney Museum last week.  I was so excited to get them back to school so they could be put on display.  These are the artworks that were student- nominated to represent each 5th grade class.  Two students’ sculptures received Honorable Mentions at the Improbable Baubles Exhibition.  I couldn’t be more proud of the students!

Bonus:  The artist statements will be saved for our annual Writing on the Walls display this spring.  This is the project that keeps on giving!

Kindergarten- Contrasting Color Collages

The kindergarten is learning about contrasting colors. Contrast is the difference between two things.  With color, contrast is the difference between light and dark colors.  We will look at Morgan Russell’s artwork Synchromy Number 4, painted in 1914.

  • What colors do you see?
  • Which are light, which are dark?
  • Do the dark colors make the light colors stand out?
  • Do the light colors make the dark colors stand out?

synchromy-number-4-to-form-1914

We will compare the colors used in Synchromy Number 4 to Starry Night, which we just learned about.  How do contrasting colors show make something stand out?

  1. Write your name and class on the back of your paper.
  2. Choose light colored papers and glue them onto your paper. You can spread them out or put them close together. *Put glue on your paper and then stick the tissue paper onto the glue.
  3. Choose dark colored papers and glue them onto the empty spaces on your paper. Fill up your page.
  4. If you have small empty spots, fill them in with crayons.
  5. Trim your edges with scissors.

3rd grade- Janet Fish Still Life Drawings

Part 3: Subject Matter- Still Life

The 3rd grade will complete their unit on the three types of subject matter.  We’ve learned that landscapes show nature and portraits show people, so now we’re moving on to learn about still lifes.  They are artworks that show objects that do not move.  The objects are still, so they’re still lifes!  Which type of subject matter do you think is the most challenging?  Why?

We’ll learn about Janet Fish’s realistic still life paintings.  She loves to challenge herself by painting transparent objects, like glass.  This is the first time we’ll draw from observation.  We will look at a still life in front of us and draw what we see.  We’ll focus on using overlapping shapes, shadows, and realistic colors.

  • Why do you think painting glass would be so challenging?
  • What do you notice about her artwork?
  • How does she use lines, shapes, colors, and textures?


Here’s how a still life is made- on an iPad!

The longer version:

  1. Write your name & class on the back of your paper. Draw a horizon line. This will be the line for the table.
  2. Your teacher will pass out 3 fruit. Pay close attention to which fruit you receive and how they are arranged.
  3. Carefully draw the fruit closest to you. Draw lightly. You might need to erase some parts. Make sure your fruit is below the horizon line.
  4. Draw the next closest fruit to you. Repeat step 3. Remember to show if one fruit is overlapping in front of another.
  5. Draw your last fruit. Repeat step 3. Your still life might look differently than your neighbor’s. They might have different fruit closest to them.
  6. Use oil pastels to color in the fruit. Add realistic colors (apples are more than just red!).
  7. Blend white and black oil pastels to make gray shadows.
  8. Use oil pastels to color your background/wallpaper.
  9. Use tempera cakes to paint your table. Check your goals and write your reflection.

Friday 3rd grade- Marc Chagall Memory Paintings

The 3rd grade is learning about Marc Chagall’s artwork I and the Village.  They learned that Chagall’s artworks are often inspired by his memories.  Artists often include symbols, or clues, about their lives in their artworks.  What symbols do you see in I and the Village?  What symbols would you include in your artwork?  Students will paint a self-portrait that includes symbols about their lives.

Learn more about I and the Village, from the Museum of Metropolitan Art (MoMA).

I and the Village
I and the Village

1st grade- Caddo Animal Pottery

The 1st grade is learning about the Caddo Native Americans from Texas.  They are learning that the Caddo have a long history of being artists and are still making amazing artwork today.

We are learning that pottery is functional art, which means it can be used or it has a job.  The shape of a piece of pottery gives us clues about how it should be used.  A mug is shaped differently than a pitcher because they are used differently.

We are creating pottery that has a job and then decorating it with animal forms, like the Caddo.

DSCN6370

Friday 1st grade- Dessert Paintings

The first grade will learn how lines, shapes, and color all work together to give viewers clues about artwork.  We will learn about Wayne Thiebaud’s dessert paintings.  What kinds of lines, shapes, and colors do you see in these artworks?  How do they help you know what types of desserts these are?

Student example:

20150520_105123

4th grade- Stained Glass Windows

The fourth grade classes will be looking at Notre Dame Cathedral in France.  We will learn that rose windows are narrative (tell stories) and have radial balance (many lines of symmetry).  Students will create their own “stained glass windows” using black paper and tissue paper.  Ms. Baird will laminate the windows and put them against the windows in the foyer.  The sun light makes them look like they are glowing!

How is stained glass made? Could you imagine doing this on a large window?

Kindergarten- Paul Klee Neighborhood Collages

Kindergarten has been learning that patterns repeat.  Can you find patterns hiding in Paul Klee’s painting, Castle and Sun? Does this city look crowded with so many buildings so close together?  Does this city look like your neighborhood?  We will create our own city collages with patterned papers.

Castle-and-Sun-by-Paul-Klee


  1. Write your name and class. Draw a line for the land.
  2. Choose two pieces of paper. Find more like your two pieces to finish your pattern.
  3. Glue your pieces in a row, these will be your buildings.
  4. Draw details on your buildings, like windows, doors, and roofs.
  5. Color in your sky and the ground. Don’t forget- this is a neighborhood.